Saturday, March 31, 2012

I'm FINE....

...you know: Freaked out, Insecure, Neurotic, and Emotional.  Fine.  

Tonight is the first night that my nightmare of what I thought would happen in a shared room for my girls is a reality.  It's 8:37pm (my girls are usually in bed by 7:15pm), and Chloe has already come in and out 5 times: twice to pee, once to poop, once because she forgot her post-toothbrushing drink, and once because Ellie was trying to get into her bed.  
"And I don't want her to."

Sigh.  

But all in all, it was a productive day.  I finished a white bedskirt for Chloe's bed, so now it actually matches.  
[If that bedroom door opens one. more. time!!!!  I'm fine.  FINE.]

I watched most of conference (there were a few crayons-over-the-balcony incidents, and some food demands, and well, a little sleep), and loved Elder Baxter's talk.  

And although I didn't "work out", I did push a heavy double stroller filled with children in about 35mph winds.   I am tough.  As Chloe would say, "Did you know?  I'm amazing.  
I'm Italian and I can do a somersault!"

So here's another one of those amazing Italian things.

Italian Cream Cake
Preheat oven to 3500.
Grease and flour three 8-inch cake pans.


Beat until they form peaks and then set aside:
  • 5 egg whites
In a separate bowl, cream together until smooth and light:
  • 1/2 cup butter
  • 1/2 cup shortening
Add and beat until fluffy:
  • 2 cups sugar
Beat in:
  • 5 egg yolks
Alternately, mixing well after each addition, add:
  • 1 teaspoon baking soda
  • 2 cups flour
  • 1 cup buttermilk*
Stir in:
  • 1 teaspoon vanilla
  • 1 1/3 cups shredded coconut
  • 1 cup chopped pecans

Fold in the stiffly beaten egg whites with a spatula.  
Spoon into prepared pans.
Bake for 25-40 minutes, until golden and toothpick inserted comes out with small crumbs.

Cool in pans for 10 minutes; remove to wire rack to cool completely.


*In lieu of buttermilk, you can add 1/2 tablespoon lemon juice to 1 cup regular milk.  Do this step first, then set aside until needed (giving the milk time to curdle=buttermilk).

Cream Cheese Frosting
Beat until smooth:
  • 12 ounces softened cream cheese
  • 3/4 cup softened butter

Add and mix until smooth:
  • 6 cups powdered sugar
Frost cake, then sprinkle chopped pecans all over.  
Refrigerate, then serve.
It takes a lot of pecans to cover  -
pricey, but completely worth it!


Thursday, March 22, 2012

The One You've Been Waiting For

Day 4.5
[Day 5 really, but I didn't work out yesterday, so it didn't really count.  But life goes on, so....4.5?]

The girls have been asking to share a room for a while now.  Since I'm selfish, and I value my sanity, I've said 'no'.  Until two days ago.  I finally succumbed and did this:
Obviously, a white bed skirt is on top of my project list.                   Getting there.

Night one went OK - Chloe had a fever and came out a few times, but then all was well.  Even day one afternoon naps were fine.  Night two?  Great.  This afternoon??  NOT.  The girls have been not sleeping for almost two hours now, and are [increasingly] exhausted.  Hoping they'll finally sleep before they need to get up for dinner and bedtime without being grumpy for the rest of the day.  Sounds pretty good in there right now. *3:26pm update: all is quiet.  Ahhh.....

So.  Order of the day.  Cake #2.  This was by far the most popular cake at the party.  Enjoy.


Raspberry Cheesecake
Adapted from Bon Appétit

Preheat oven to 325*
Butter a 9" springform pan.
Double-wrap the outside of the pan with aluminum foil.

Crush:
  • 9 ounces oreo cookies, frosting included
Add and mix:
  • 6 tablespoons melted butter
Press crumb mixture firmly onto bottom and halfway up sides of prepared springform pan.
Bake 8 minutes; cool on rack.

Press though a fine strainer into small bowl and set aside:
  • 12 ounces frozen unsweetened raspberries, thawed with juices reserved*
*AWESOME EASY TIP: use an old pair of clean pantyhose - cut off about 12" from the toe, use a spoon to add your raspberries, and squeeze out.  

In mixer, beat until smooth:
  • 32 ounces cream cheese, softened
  • 1 1/3 cups sugar
Add and mix:
  • 2 tablespoons flour
Beat in, one at a time:
  • 4 large eggs
Beat in:
  • 2 tablespoons heavy cream
  • 2 teaspoons vanilla
Stir in:
  • prepared raspberry puree (about 3/4 cup)
Place springform pan in a deep cookie sheet/roasting pan.  Add about 1" hot water.  Pour batter into prepared crust.  Bake 80-90 minutes, until filling is set in the center and barely browning around the edges.  
Use knife to go between pan and cake (as the cake cools, this will keep the top from splitting), then refrigerate uncovered until cold, at least 4 hours.  

I topped this with a raspberry puree (and fresh raspberries):
In a saucepan over medium heat, stir:
  • 1 pint raspberries (I used frozen, thawed)
  • sugar to taste (about 1/4 cup)
  • lemon juice to taste (I used none)
Bring to a boil and cook until slightly thickened, but still fairly liquid.  Strain (see awesome tip above, but wear heat resistant gloves or wait until it's cooled a bit).  Keeps in fridge for about a week.  But your cheesecake will probably only last a day, so don't worry about it.


Tuesday, March 20, 2012

Sting of the Bee

For the next for days, I'll be posting all of the recipes from my birthday party.

[It's penance.]

To remind me that eating four cakes in a week probably isn't a good idea.  

I do, however, still stand firm that is was totally worth it.  

Only 30 pounds to go!  [Today is day four, and this cake is titled remarkably like my legs feel.]

Sting of the Bee is directly behind
the raspberry cheesecake.

Sting of the Bee (Beinenstich) Cake
Adapted from The Lion House Bakery

TOPPING
In a medium saucepan, melt until almost boiling:
-1/2 cup butter

Add, stirring constantly, and bring to a boil:
-1/2 cup sugar

Slowly add and stir carefully, returning to a boil:
-2 tablespoons milk

Add and bring to a boil
-1 cup macadamia nuts (whole, dry roasted is my preference)

Remove from heat and stir in
-2 teaspoons vanilla

Allow to cool to room temperature, or in refrigerator.  It should be thick and creamy.  It should be the same temperature as the cake batter for best results.

CAKE
Preheat oven to 375*.  Prepare a 10-inch springform pan: place parchment or waxed paper on bottom and attach the side, then coat the sides with nonstick spray and dust lightly with flour.

Cream until fluffy
-1 cup softened butter
-2/3 cup sugar

Add and mix well
-2 eggs

Mix in
-3 cups sifted flour
-1 tablespoon baking powder
-1 teaspoon salt

Slowly add:
-1/2 cup milk

Beat until dough is thick and doesn't stick when touched.
Press dough evenly in springform pan.  Sprinkle lightly with flour and tap dough down with the bottom of a cup.  Dough should feel firm and press against the sides of the pan.  
Pour topping on dough and spread evenly.  
Cover with foil and bake for 30 minutes.  Uncover and bake additional 10-15 minutes until cake looks firm and golden brown.  
Allow to cool.  Slice horizontally.  Fill with Butter Cream Filling and raspberry preserves.

BUTTER CREAM FILLING
In mixer, beat until fluffy
-1 cup softened butter
-2 cups powdered sugar
-2 eggs yolks
-2 teaspoons vanilla

Spread on bottom half of split cake.  Spread about 1/2 cup raspberry preserves on top of butter cream and replace cake top.  

Monday, March 19, 2012

Joy and Rupture

The meringues are way in the
back in the large white bowl.
For my 30th birthday, I threw myself a party.  An all-out fantastic do.  Streamers, balloons, lanterns, and ribbons hanging from the ceilings; fresh flowers and freshly polished silver; Italian sodas; four of my favorite cakes (yes, four) and my traditional Valentine birthday treat; lots of friends.  It was grand.

As it turned out, my gift to myself on my 30th birthday was to gain about 30 pounds.  Seriously?  Not all at once, mind you - there's my annual winter insulation contribution, too - but ungh.  I guess that kind of party is something to do only once every 30 years.

So I've started "working out" again.  Which is actually "working in", because I do it in my living room.  Today is Day 3 (with days 1 and 2 being sometime about a week and a half ago), but I'm teaching a lesson tonight on being active and taking care of our bodies.  So I'm pumped and ready* to be a good example.
(*"pumped and ready" = "feeling guilted into being")

Feel free to keep the encouragement coming.  Anyone want to make me a star chart?  With cheesecake as a prize??


Meringues
Lia's traditional birthday treat
k
Preheat oven to 2500.


Beat to soft peaks:
  •         4 egg whites
  •         ¼ teaspoon cream of tartar

Add:
  •         ¾ cups sugar

Pipe shapes on parchment paper lined baking sheets (traditionally hearts in our house for Lia’s birthday).

Bake 1 hour: cool 30+ minutes in oven with door slightly cracked.

Fill with beaten mixture of:
  •         1 cup heavy cream
  •         2 tablespoons powdered sugar

Add fresh berries (traditionally strawberries) of choice and serve.


Store in a DRY place – humidity will make them gummy.

Friday, March 16, 2012

Twice-Baked

As I age and my girls grow up, there's nothing I like more than teaching them about our history - about where we come from and who we are.  That's why they are both named for women in my family, from both sides.  I want them to treasure who they are, who their ancestors were, and what they can become together.

Obviously, a huge part of my childhood revolved around good food.  Not just eating it (though there was plenty of that, too), but planting, growing, harvesting, picking, cleaning, canning, sharing.  My oldest daughter is three, and last fall she helped me can about 50 quarts of tomatoes.
I remember distinctly canning peaches in my mother's kitchen: all of us lined up in a row doing our job.  Happiness.  My grandfather - Pop - had an enormous garden.  I could get lost in there.  And I sometimes did, on purpose.  He tied his beans with grass, had the best corn in the world, and we'd eat the tomatoes like apples, juicy seeds dripping down our chins.  I loved being sent to the garden to get ingredients.

This week, I was invited to speak about Italy for a church presentation about cultures of the world.  I was also invited to bring a traditional dessert.

Biscotti.... literally, "twice-baked".  I grew up with these every Christmas - my Italian family eschewed the more Americanized biscotti made for dipping; Grandma's were always made with anise oil and we ate them plain.  They're not too sweet (though the Christmas ones do have a nice glaze), crunchy, and deliciously like, well, family.  I like to make them now more often than at Christmas, and with varied flavors.  They are always an easy, delicious treat.

These biscotti have no almonds - I had none, but are still tasty.
Cocoa Almond Biscotti
Preheat oven to 350*

Mix until fluffy:
  • 1/2 cup softened butter
  • 1 cup sugar
Add and mix:
  • 2 eggs
  • 1 1/2 tablespoons raspberry syrup
Add and mix:
  • 2 1/4 cups flour
  • 1 1/2 teaspoons baking powder
  • 1 1/2 tablespoons cocoa
Add and mix:
  • 1+ cup almonds (I prefer whole, but you may also used slivered)
Form two logs, each about 9"x2".
Placed on a greased cookie sheet with room in between (they will spread).  
Bake for 30 minutes.  Cool 5 minutes, then remove to racks to cool completely.
Cut into 1/2" slices on a diagonal.

Bake 5 minutes per side.  Cool on rack. 


Friday, March 9, 2012

My Crunchy Cause (and my first tutorial!)

Generally speaking, I'm not much for causes.  But this one speaks to me.  It's functional, I understand it, I do it myself, and I'm all for it.  I volunteer for it.  And it makes me happy.  Days for Girls - check it out.  Ask them, ask me, get involved if you can.  Today, I helped my local chapter assemble 60 kits to send to Uganda in May.  Hurrah! 

Brace yourselves for TMI.  However as most [eleven] of my [twelve] followers are my close friends, you already realize that TMI comes with the territory. 

I make and use my own cloth menstrual pads.  They're heavenly.  Most of you think they're gross, but I assure you, they're not.  I have been cloth diapering for four years, and using cloth toilet paper since June.  So this wasn't a very big leap.

After the birth of my second child, I was unable to use tampons.  Massive discomfort.  I tried a menstrual cup, but with the same problem.  I hate disposable pads.  HATE.  HATE.  HATE.  So I figured I had nothing to lose in trying cloth pads, especially since I had everything I needed in the house (yay for free and a project).   And I am so very glad I did. 

I searched the internet for patterns.  I found the Days for Girls patterns here.  I didn't find any one that was perfect for me - but this one was my favorite.  I changed it to suit me - a bonus of making your own....  I also made myself some larger "night-time" pads.  Whether making regular or overnight, I use terry cloth - old towels - for the absorbent part, and flannel or fleece for the outer layers.  For  my first ones, I didn't bother using a waterproof material for the backing, because I wanted to make sure I liked them, and I didn't have any on hand.  Fleece has turned out to be my favorite material for the portion touching my skin.  It wicks away moisture and is so soft!  And I've found that except for the heaviest days, I don't need the waterproof backing.  I put it on my overnights, just in case, and on a bunch of daytime ones in case I'm running errands and can't change as often as I'd like. 

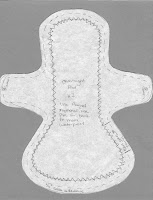
1.  Print two copies of the pattern.  Cut one along the outer edge and the other along the inner zig-zag edge. (If you print out the pattern from the above link, it comes out to size, about 9" long.  I don't know how to do that, but from top to bottom, the overnight pad should be 10.125" and 8.5" from wing to wing.)

2.  Using the outer pattern, cut two layers of flannel, fleece, etc. for your outer layers.  *Note: if you want a waterproof back, cut one layer from PUL and one of fleece or flannel. 

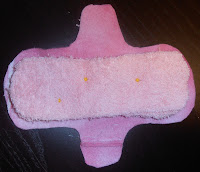
3.  Using the inner pattern, cut as many layers of absorbency as you like out of terry cloth, microfiber, or cotton batting.  I use three layers and like it - not too thick, but does the job.

4.  Pin your absorbent layers onto the wrong side of your top layer - the fabric that will be touching your skin - and sew around the edge.  I like a zig-zag stitch; I think it keeps it in place better.


5.  Put your back layer down with the right side facing you (if you're going for waterproof, this is your PUL layer, and the shiny side is the "wrong" side).  Place your top and absorbent layers on top, right sides together, and pin.  Sew with a straight stitch, leaving a 3-4 inch gap to turn.  *Note:  It's easiest to leave the gap on a straight-ish part of the pad if you're using PUL.  If I'm not using PUL, I leave my gap on the rounded bottom edge.  Do whatever is easiest for you. 

6.  Turn right side out.  Use a chopstick to fully round your edges and get the wings out all the way. 


7.  Top stitch all around the pad, and close your turning gap.  I like to zig-zag over the gap, just to make sure it's caught, and prefer a straight stitch around the rest. 
8.  Optional:  attach a snap.  I use KAM snaps, but you can use anything you want, including a safety pin.  If your bottom layer is flannel/fleece, they pretty much stay in place even without a snap.  


That's it!  Easy as pie.  It's like a cloud for your vagina.

When you're out and about, you can put spare and soiled pads in a Planet Wise mini wet/dry bag (mine is Chic Petunia).  At home, put soiled pads in a lidded stock pot covered with an inch or two of water, and wash as needed.  I've had no staining whatsoever, and the pot is hidden behind the shower curtain.  They don't smell, they're super comfy, and I recommend them to anyone with girl parts and a washing machine.

You can also sew channels in your pads to direct the flow and keep the absorbent layers in place.  I tried with a few, but it's just an extra step and doesn't really do anything for me.  If you are going to do this, it goes with  step #4 - you can do it before or after sewing around the edges of your absorbent layers.  Just don't sew the channels through PUL (if using) - you want as few stitches as possible through your PUL.  Also, I've read that polyester thread is best to use with PUL as it wicks better, but as it's just around the very edge, I haven't worried about that.

And now, for you recipe gluttons who don't go for this tutorial, here's something fitting for my hippy ways:


Granola
Preheat oven to 300o.
 In a large bowl, combine:
  • 7 cups rolled oats
  • 1 ½ cups walnuts
  • ½ cups almonds
  • 1 ½ cups brown sugar
  • 1 tablespoon cinnamon
  • 1 cup wheat germ
  • 1 ½ cups sesame seeds
  • 1 ½ cups sunflower seeds
Add and mix:
  • 1 cup melted butter
  • 1 tablespoon vanilla 
Bake on two cookie sheets for 45 minutes. 
Use a spatula to turn granola every 15 minutes.
Let cool.
Add craisins, raisins, dried apricots, coconut, chocolate chips…
Fabulous served with fresh or frozen berries and cream.
 *You can play around with the body of your granola; don’t add sesame or sunflower seeds, add pecans.  Do whatever you like!*