Monday, March 19, 2012

Joy and Rupture

The meringues are way in the
back in the large white bowl.
For my 30th birthday, I threw myself a party.  An all-out fantastic do.  Streamers, balloons, lanterns, and ribbons hanging from the ceilings; fresh flowers and freshly polished silver; Italian sodas; four of my favorite cakes (yes, four) and my traditional Valentine birthday treat; lots of friends.  It was grand.

As it turned out, my gift to myself on my 30th birthday was to gain about 30 pounds.  Seriously?  Not all at once, mind you - there's my annual winter insulation contribution, too - but ungh.  I guess that kind of party is something to do only once every 30 years.

So I've started "working out" again.  Which is actually "working in", because I do it in my living room.  Today is Day 3 (with days 1 and 2 being sometime about a week and a half ago), but I'm teaching a lesson tonight on being active and taking care of our bodies.  So I'm pumped and ready* to be a good example.
(*"pumped and ready" = "feeling guilted into being")

Feel free to keep the encouragement coming.  Anyone want to make me a star chart?  With cheesecake as a prize??


Meringues
Lia's traditional birthday treat
k
Preheat oven to 2500.


Beat to soft peaks:
  •         4 egg whites
  •         ¼ teaspoon cream of tartar

Add:
  •         ¾ cups sugar

Pipe shapes on parchment paper lined baking sheets (traditionally hearts in our house for Lia’s birthday).

Bake 1 hour: cool 30+ minutes in oven with door slightly cracked.

Fill with beaten mixture of:
  •         1 cup heavy cream
  •         2 tablespoons powdered sugar

Add fresh berries (traditionally strawberries) of choice and serve.


Store in a DRY place – humidity will make them gummy.

Friday, March 16, 2012

Twice-Baked

As I age and my girls grow up, there's nothing I like more than teaching them about our history - about where we come from and who we are.  That's why they are both named for women in my family, from both sides.  I want them to treasure who they are, who their ancestors were, and what they can become together.

Obviously, a huge part of my childhood revolved around good food.  Not just eating it (though there was plenty of that, too), but planting, growing, harvesting, picking, cleaning, canning, sharing.  My oldest daughter is three, and last fall she helped me can about 50 quarts of tomatoes.
I remember distinctly canning peaches in my mother's kitchen: all of us lined up in a row doing our job.  Happiness.  My grandfather - Pop - had an enormous garden.  I could get lost in there.  And I sometimes did, on purpose.  He tied his beans with grass, had the best corn in the world, and we'd eat the tomatoes like apples, juicy seeds dripping down our chins.  I loved being sent to the garden to get ingredients.

This week, I was invited to speak about Italy for a church presentation about cultures of the world.  I was also invited to bring a traditional dessert.

Biscotti.... literally, "twice-baked".  I grew up with these every Christmas - my Italian family eschewed the more Americanized biscotti made for dipping; Grandma's were always made with anise oil and we ate them plain.  They're not too sweet (though the Christmas ones do have a nice glaze), crunchy, and deliciously like, well, family.  I like to make them now more often than at Christmas, and with varied flavors.  They are always an easy, delicious treat.

These biscotti have no almonds - I had none, but are still tasty.
Cocoa Almond Biscotti
Preheat oven to 350*

Mix until fluffy:
  • 1/2 cup softened butter
  • 1 cup sugar
Add and mix:
  • 2 eggs
  • 1 1/2 tablespoons raspberry syrup
Add and mix:
  • 2 1/4 cups flour
  • 1 1/2 teaspoons baking powder
  • 1 1/2 tablespoons cocoa
Add and mix:
  • 1+ cup almonds (I prefer whole, but you may also used slivered)
Form two logs, each about 9"x2".
Placed on a greased cookie sheet with room in between (they will spread).  
Bake for 30 minutes.  Cool 5 minutes, then remove to racks to cool completely.
Cut into 1/2" slices on a diagonal.

Bake 5 minutes per side.  Cool on rack. 


Friday, March 9, 2012

My Crunchy Cause (and my first tutorial!)

Generally speaking, I'm not much for causes.  But this one speaks to me.  It's functional, I understand it, I do it myself, and I'm all for it.  I volunteer for it.  And it makes me happy.  Days for Girls - check it out.  Ask them, ask me, get involved if you can.  Today, I helped my local chapter assemble 60 kits to send to Uganda in May.  Hurrah! 

Brace yourselves for TMI.  However as most [eleven] of my [twelve] followers are my close friends, you already realize that TMI comes with the territory. 

I make and use my own cloth menstrual pads.  They're heavenly.  Most of you think they're gross, but I assure you, they're not.  I have been cloth diapering for four years, and using cloth toilet paper since June.  So this wasn't a very big leap.

After the birth of my second child, I was unable to use tampons.  Massive discomfort.  I tried a menstrual cup, but with the same problem.  I hate disposable pads.  HATE.  HATE.  HATE.  So I figured I had nothing to lose in trying cloth pads, especially since I had everything I needed in the house (yay for free and a project).   And I am so very glad I did. 

I searched the internet for patterns.  I found the Days for Girls patterns here.  I didn't find any one that was perfect for me - but this one was my favorite.  I changed it to suit me - a bonus of making your own....  I also made myself some larger "night-time" pads.  Whether making regular or overnight, I use terry cloth - old towels - for the absorbent part, and flannel or fleece for the outer layers.  For  my first ones, I didn't bother using a waterproof material for the backing, because I wanted to make sure I liked them, and I didn't have any on hand.  Fleece has turned out to be my favorite material for the portion touching my skin.  It wicks away moisture and is so soft!  And I've found that except for the heaviest days, I don't need the waterproof backing.  I put it on my overnights, just in case, and on a bunch of daytime ones in case I'm running errands and can't change as often as I'd like. 
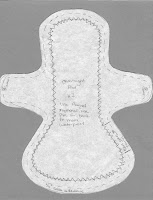
1.  Print two copies of the pattern.  Cut one along the outer edge and the other along the inner zig-zag edge. (If you print out the pattern from the above link, it comes out to size, about 9" long.  I don't know how to do that, but from top to bottom, the overnight pad should be 10.125" and 8.5" from wing to wing.)

2.  Using the outer pattern, cut two layers of flannel, fleece, etc. for your outer layers.  *Note: if you want a waterproof back, cut one layer from PUL and one of fleece or flannel. 
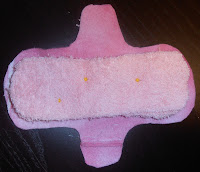
3.  Using the inner pattern, cut as many layers of absorbency as you like out of terry cloth, microfiber, or cotton batting.  I use three layers and like it - not too thick, but does the job.

4.  Pin your absorbent layers onto the wrong side of your top layer - the fabric that will be touching your skin - and sew around the edge.  I like a zig-zag stitch; I think it keeps it in place better.


5.  Put your back layer down with the right side facing you (if you're going for waterproof, this is your PUL layer, and the shiny side is the "wrong" side).  Place your top and absorbent layers on top, right sides together, and pin.  Sew with a straight stitch, leaving a 3-4 inch gap to turn.  *Note:  It's easiest to leave the gap on a straight-ish part of the pad if you're using PUL.  If I'm not using PUL, I leave my gap on the rounded bottom edge.  Do whatever is easiest for you. 

6.  Turn right side out.  Use a chopstick to fully round your edges and get the wings out all the way. 


7.  Top stitch all around the pad, and close your turning gap.  I like to zig-zag over the gap, just to make sure it's caught, and prefer a straight stitch around the rest. 
8.  Optional:  attach a snap.  I use KAM snaps, but you can use anything you want, including a safety pin.  If your bottom layer is flannel/fleece, they pretty much stay in place even without a snap.  


That's it!  Easy as pie.  It's like a cloud for your vagina.

When you're out and about, you can put spare and soiled pads in a Planet Wise mini wet/dry bag (mine is Chic Petunia).  At home, put soiled pads in a lidded stock pot covered with an inch or two of water, and wash as needed.  I've had no staining whatsoever, and the pot is hidden behind the shower curtain.  They don't smell, they're super comfy, and I recommend them to anyone with girl parts and a washing machine.

You can also sew channels in your pads to direct the flow and keep the absorbent layers in place.  I tried with a few, but it's just an extra step and doesn't really do anything for me.  If you are going to do this, it goes with  step #4 - you can do it before or after sewing around the edges of your absorbent layers.  Just don't sew the channels through PUL (if using) - you want as few stitches as possible through your PUL.  Also, I've read that polyester thread is best to use with PUL as it wicks better, but as it's just around the very edge, I haven't worried about that.

And now, for you recipe gluttons who don't go for this tutorial, here's something fitting for my hippy ways:


Granola
Preheat oven to 300o.
 In a large bowl, combine:
  • 7 cups rolled oats
  • 1 ½ cups walnuts
  • ½ cups almonds
  • 1 ½ cups brown sugar
  • 1 tablespoon cinnamon
  • 1 cup wheat germ
  • 1 ½ cups sesame seeds
  • 1 ½ cups sunflower seeds
Add and mix:
  • 1 cup melted butter
  • 1 tablespoon vanilla 
Bake on two cookie sheets for 45 minutes. 
Use a spatula to turn granola every 15 minutes.
Let cool.
Add craisins, raisins, dried apricots, coconut, chocolate chips…
Fabulous served with fresh or frozen berries and cream.
 *You can play around with the body of your granola; don’t add sesame or sunflower seeds, add pecans.  Do whatever you like!*

Tuesday, December 6, 2011

Fat is Flavor!

It's true.  And I won't have it any other way.

My daughter had her 18 month old check-up a few weeks ago, and she's risen from the 3rd all the way to the 8th percentile - woohoo!  Dr. Bell asked about breastfeeding and cow's milk - both of which my daughter drinks without a problem - and clarified that she should only be drinking whole cow's milk.  That was very important.  I laughed out loud, and told him we girls were a whole everything kind of family.  He looked at us all, smiled, and said: "With you girls, that's probably just fine."

See?  Fat doesn't mean fat.  (Not that it didn't boost my ego just a little bit.)  But fat is healthy - and flavorful and good.  And you can't keep me away from it!  Given the choice between a "healthy" version and a full-fat, take a guess at which one I go for...  FATTY-FAT-FAT!!  Because ten times out of ten, it will taste better.  And what's more?  Your body compensates by telling you that you're full sooner.  I'd rather have less of something wonderful than more of something gross.  Wouldn't you?

Things you can always find in my fridge: heavy cream, whole milk, real butter, cream cheese, some kind of Italian cheese, and bacon.  Always.  (And even though she's a constant and great eater, my daughter is still only in the 8th percentile.  See?!)

And realize, that in my recipes, I always, always mean the following:
milk = whole milk
butter = butter!!  (not margarine, butter spread, or anything else)
cheese, cream cheese, etc. = full fat versions of these things
heavy cream = heavy cream (not half & half)

So here's a recipe with three of my staple ingredients, cream cheese, Italian cheese, and bacon.  (And really, what isn't better with these things?)  It was a hit at the party - which means there's only a measly peasly bit left.... my apologies for the crummy picture.  But take it to heart that it just means it's great.  Really great.

Spinach-Artichoke Dip With Bacon
Preheat oven to 325*

In a stand mixer, combine:

  • 16 ounces cream cheese
  • 1/3 cup Parmesan cheese
  • 1 teaspoon garlic powder
  • 9 ounces chopped spinach (frozen is fine)
  • 1 can artichoke hearts, drained and chopped 
  • 6+ slices cooked bacon

Pour into a serving dish - I use an 11" tart pan - and sprinkle with more Parmesan and bacon.  Bake for 25 minutes.  Serve immediately with crackers of your choice.

Saturday, December 3, 2011

What Did You Do Today?

When I woke up this morning, I thought: "I'm going to throw a party tonight!"  Seriously.  I know, I'm a little nuts.  But I needed [wanted] some good friends and good food.  And so I did.
The menu was simple: date rolls (a Christmas tradition), poundcake, almond croissant bread pudding, pâté, and spinach-artichoke dip with bacon.  And hot cider.  Mmmmm.
Gratefully, I have a well-stocked pantry, and only needed to make a quick trip to the store for only one item.  (One Mommy, two littles = 10 minutes.  A miracle if there ever was one.)
So we ate, we gabbed, the girls played with little friends, then everyone went home and I fell asleep while putting the girls down.  Now isn't that just a perfect day?


Date & Nut Rolls
Mix:
  • 1 can sweetened condensed milk
  • 1 cup chopped dates
  • 1 cup chopped walnuts
  • 2 1/2 cups mini marshmallows
Stir in:
  • 1 3/4 cups fine graham cracker crumbs
Mix well and roll into about 4 logs.  Dough will be very sticky.  Cover in fine shredded coconut and wrap tightly with saran wrap.  Store in fridge and slice in rounds when ready to serve.  

*History:  This recipe comes from my Great-Great Aunt.  When my mother first made them, she would roll individual bite-sized balls...  it took forever!  When she was pregnant with me, she started making the logs, and we've been doing it that way ever since.

Thursday, December 1, 2011

Happy December First!

To say that I like December First is a bit of an understatement.
It may even be better than Christmas.
It is the welcoming of the season, the snow; of clean white beauty and joy in the world around us.  I love it.
Traditionally, we start of the morning with cream of wheat parfaits (1 cup whole milk + 1/3 cup cream of wheat - simmer about 2 minutes until it begins to thicken.  Layer in a pretty glass with raspberry preserves and whipped cream).
We open an advent calendar to begin the countdown.  This year, I decided to put a little activity in each bucket - story time with a Christmas book, singing carols, making cookies; we started off the season by bringing treats to some friends!  We open some gifts, have some [more] treats, and make the house look like Christmas.  It's a lovely all-day affair.  This year, we'll be vacationing over Christmas so we didn't cut down our tree, but that is also a December First activity.
We did hang our garland with lovely glass icicles and  my favorite glass mercury ornaments (and my fairy - I've never found an angel I like, but this pretty little thing just... fits).

In honor of the start of this wonderful season, today's recipe is one of my favorites.  I serve it as breakfast, though some people insist that it is a dessert.  Warm comfort, and just makes you want to share.  It's that good.  If you've never had good bread pudding - and trust me, if you didn't like it, it's because it wasn't good - give this one a shot.  After all, it's Christmas!

Almond Croissant Bread Pudding

Preheat oven  to 350*.

Microwave until hot (about 3 minutes):

  • 1 1/3 cups whole milk
  • 1 1/3 cups heavy cream
  • 1/2 teaspoon salt
  • 1/2 teaspoon vanilla
  • 6 T. sugar
Whisk in:
  • 4 egg yolks
  • 2 tablespoons amaretto (in a pinch, amaretto syrup will do, but it will make your pudding a bit sweeter)
In a buttered deep dish pie plate:
  • 3 croissants, cut into 1" pieces
  • pour liquid on top
  •  sprinkle liberally with sugar (coarse sugar is divine and gives a lovely crunch, but lacking that, granulated works just fine)
Bake until set and golden, about 40-50 minutes.  It will deflate when you serve it.  Best warm.

Sunday, July 17, 2011

...and this one's for you

I love my life here.  My new friends, old friends that have come to visit, friends I haven't met yet, my gramma, the mountains, walking to 7-eleven for pina coloda slurpees, Bear Lake.  It's great.  My girls are happy; I'm happy.
But I also miss some things.  The country.  Walking around in my undies without worrying who can see in my windows.  My sister.  My parents.  Diversity.  My hair dresser.  But more specifically tonight, people.  We made a treat for some new friends, which was delicious, but made me crave some old friends.  (Happy Birthday, Grace Money.  We made these with you in mind.  Hope it was fab.  Now come visit us!) 
In life, there are some people who are family, even though they're not family.  You know.  I am so grateful for those people.  It's the little things...and the big things.  I am so blessed to know them; to have such a wonderful family. 
Thanks for being so gosh-darn inappropriate at all the right times.  You know who you are.  We love you, and wish we could cook for you always.  xoxo, Me & the Nuggets


Chewy Gingersnaps
Preheat oven to 375*

Combine:
  • 1/2 cup softened butter
  • 1 cup sugar
  • 1/4 cup molasses (not blackstrap*)
  • 1 egg
Stir in:
Add and mix well:
  • 2 teaspoons baking soda
  • 2 cups flour
  • 1/2 teaspoon ground cloves
  • 1 teaspoon ground ginger
  • 1 teaspoon cinnamon
  • 1/2 teaspoon salt
Form 1" balls and roll in granulated sugar.
Place on ungreased cookie sheet, 2" apart.
Bake 8-10 minutes.  Makes about 3 dozen cookies.

*If you only have blackstrap molasses, use 1/8 cup blackstrap and 1/8 cup honey.